Saturday, 31 August 2013

Saatchi Gallery - August 2013

It's been a while since I blogged about an exhibition or a gallery that I've been to. I kind of miss it, so I'm going to try to start again.

A few weeks ago, I made the effort to go to the Saatchi Gallery. Here are some photos from my trip.


 1) Dawn Clements - "Travels with Myra Hudson"
2) Dawn Clements - "Movie"
3) Dawn Clements - Close up of "Untitled (Coloured Kitchen)"
4) Jodie Carey - "The Daily Mail - Arrangement One"
5) Miler Lagos - "Fragments del Tiempo "
6) Close up of the branches.
7) Yuken Teruya - "Golden Arch Parkway McDonald's (Blue Tree)"
8) Yuken Teruya -"LVMH - Louis Vuitton"
9) Tom Thayer - "Nature Scene"
10) Marcelo Jacome - "Planos-pipas n17"
11) Elisa Strozyk - "Fading Red"
12) Victor Ash - "The Red Dog"
13) Guvenc Ozel - "Cerebral Hut"
14) Jeongmoon Choi - "Drawing in space - Transformation"

Thursday, 29 August 2013

Attracting Wildlife

During my first year at Uni, we had a project that everyone had to do called The London Project.
For this project, we went on a walk and draw from Holborn to the Tate Modern along the Southbank and on this journey we had to find something that inspired us.  My favourite thing that I saw on my journey was a squirrel, so I decided to do a project about attracting more squirrels to the Thames. I ended up making some biodegradable feeders from citrus fruits and used cotton string to hang them up. I decided that I wanted them to be bright and colourful, which is why I chose citrus fruits. As well as it had to be biodegradable because I didn't want to harm the environment. 
Once they were made, I decided to test out these feeders and I knew that St James Park has a variety of wildlife. It seemed to work well and lets just say I made lots of animals friends that day because I was the food lady.
For the final piece, I made a poster with a photo of the feeders, but truthfully it wasn't very good. However recently I was thinking about revisiting some projects and I really liked those feeders that i made and I felt that I could do more with the project. So I decided to turn this project into attracting more wildlife into our gardens because it's a good way to teach children about wildlife and I just quite enjoy watching wildlife visiting my garden. 

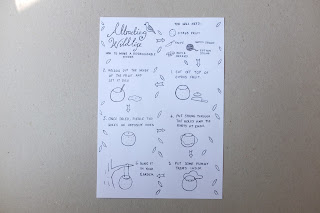
Therefore I decided to make a little fold out leaflet, which teaches you how to make the biodegradable feeders and illustrated the instructions, so that it's simple enough to create and could even be a project to do with children. I decided to separate it into eight sections, so when you fold it up, each section has a single instruction. Below is a picture of my instructions.
Then I coloured them in with watercolours to make them colourful and enjoyable to look at.
The picture on the left has a plain background and on the right, I decided to try a dotted coloured background, which I ended up quite liking.
So one side was done, but on the other side was blank, so I decided to create an illustration showing the feeders with imaginary animals coming to visit. My illustration started from a photo that I took of the three feeders that I made.
 
As I coloured the instructions in with watercolours, I thought it would be best to do the other side as well.
 
My next step after that was to draw some animals to go into my illustration. I decided on a blackbird, a squirrel and a wood pigeon because they are all animals that you may find visiting your garden.

Then I added the animals to my illustrations and decided to colour in my background, which I thought turned out quite nicely, but I felt that the feeders needed some colour. However I decided to keep the animals in black and white because I wanted it to look as though, only with the feeders can you attract these animals to your garden.
I ended up colouring the feeders in bright colours because I wanted them to be eye catching as they are the main focus of the piece.


Once everything was done, I tested it out and ended up printing it out on 160gsm card because I wanted it be durable.

 For more images of the final piece please visit: http://miss-pang.com/Attracting-Wildlife

Tuesday, 27 August 2013

Animal Colouring Book - Part 2

It took some time, but I finally did get around to sorting out this colouring book.

With the cover, I decided to do an illustration of a group of animals that are featured in the colouring book. I decided to keep it black and white, so that the person colouring in, can colour the cover as well.
Once the layout was all done, I thought I would try a test print on some 80gsm copier paper to see how it looked. Somehow I ended up with an extra spread blank, so with the test print, I ended up gluing the middle page together.
As I racked my brain, trying to work out what could I do with the extra spread. My friends suggested that I could do an illustration with all the animals from the colouring book.
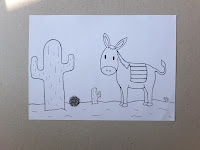
I also decided to redo the donkey, owl and squirrel because I felt the original illustrations didn't really fit with the rest of the book.
Once all my images were in order and my layout was sorted, it was time to choose the paper, the photo below show L-R: 80gsm, 120gsm, 160gsm.
 
I decided that 80gsm wasn't the right choice as it showed the other images through onto the next page. Then 160gsm was too thick and difficult to bind. However 120gsm was perfect because the paper was light enough to make it easy to fold and bind, but also be thick enough not to show through the other illustrations. With the binding, I decided to go with a simple 3 hole pamphlet stitch in white thread because I felt I needed a binding which would hold the paper nicely as it would be too thick to staple and I wanted something that didn't interfere with the illustrations inside.

For images of the final piece, please visit http://miss-pang.com/Animals

Sunday, 25 August 2013

Screen prints

Here are a few screen prints, which I have made lately: 

I'm hoping to test print the flower and the tree pattern onto fabric, but at the moment that's on hold while I sort out my website. Also the sugar skull isn't quite finished yet, but hopefully it will be soon. Next layer is all ready for me to screen print tonight.   

Thursday, 8 August 2013

Animal Colouring Book - Part 1

In the last 6 months, I've spent more time drawing and trying to create projects for myself. So as I enjoy drawing animals, I decided to make an Animal A to Z colouring book for my friend's daughter.

I started the process by working out a list of animals, this is what I came up with:

A - Aardvark                         N - Nightingale   
B - Bear                                O - Owl
C - Cat                                  P - Peacock
D - Donkey                            Q - Quail
E -  Elephant                          R - Rabbit
F - Flamingo                           S - Squirrel 
G - Giraffe                            T - Tortoise
H - Hedgehog                         U - Umbrella Bird
I - Iguana                               V - Vulture
J - Jellyfish                            W - Whale
K - Kangaroo                          X - X-Ray Tetras
L - Lemur                               Y - Yak
M - Magpies                           Z - Zebra

 
I ended up with a pile of illustrations.
As I looked through the animals, I decided some of the pictures would look better with more of a background.
So in the progress of getting the pictures finished, I started looking at typefaces and at first I tried this. 

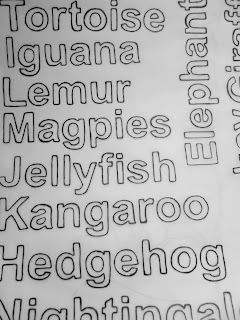
However it didn't have the right feel, so I ended up tracing around a typeface, to make it more hand drawn and friendly. 

During this process, I decided to start screen printing again. I thought the elephant and the whale would make good three colour prints. The first print I made was the whale, but as I was using an old screen, you could see ghosts from previous prints, so I ended up buying a new screen. 
 The new screen helped and the whale looks a lot better
 Next up was the elephant, but I decided to be a bit more playful with colour of the elephant. 
Now my room is surrounded with cute animals. Next step is to sort out the layout........